Home »
Python
PyQt Event handling mechanism
PyQt Event handling mechanism: In this article, we are going to study about the Event handling in PyQt. Earlier we have used some widgets, but we didn’t implement any event and its handling. Before, we go further to use more widgets and build interesting responsive GUI; we need to understand a little theory behind them. In the upcoming articles we will better create GUI applications through event handling.
Submitted by Atul Anand, on December 12, 2017
Events
In the console made application, instructions/commands are executed in sequential manner. But GUI based applications are event driven. This means functions/methods are executed in response to some events. These events may be user generated (button clicked, selecting items, mouse click, etc.); but sometimes your system also generates some events (Window manager, Internet connection, or a timer). The application enters the main loop when we execute the exec_() method.
The event model of PyQt involves three participants.
- Event Source: It generates the event. It is the object that whose state changes.
- Event Object: The event object or simply “event” binds the state changes in the Event.
- Event Target: The event target is the object that needs to be notified.
Signals and Slots
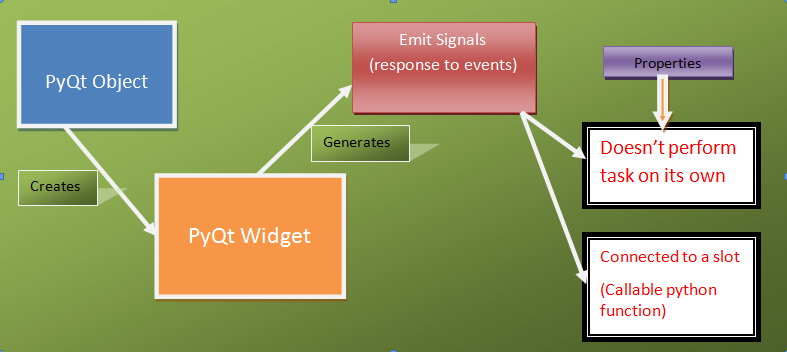
Signals and Slots are used as messages to communicate between QObject. PyQt has a special mechanism of handling slots and signals. A signal is generated whenever an event occurs. A slot can be any callable Python function. It is called when a signal connected is called.
You can understand this mechanism and functioning of signals and slots through the figure given below:

The New PyQt API
The connection between the slot and Signals can be achieved through many ways. First one is the older one and second is considered a New API.
Old way:
QtCore.QObject.connect(widget, QtCore.SIGNAL('signalname'), slot_function)
New Way:
widget.signal.connect(slot_function)
Note: The second method is considered more pythonic. And most frequently used out of the two methods mentioned.
These are explained below by using a simple “click” event generated by a widget "button".Viz.
Old way:
QtCore.QObject.connect(button, QtCore.SIGNAL("clicked()"), slot_function)
New Way:
button.clicked.connect(slot_function)
Example
Here, I am providing a simple example for handling events in PyQt. This is actually a case of "mouse button press" event. Here, I am considering the left click/ right click of the mouse. When you press the mouse button in the window area, the GUI window will simply close down.
Source Code
import sys
from PyQt4 import QtGui, QtCore


class Communicate(QtCore.QObject):

    closeApp = QtCore.pyqtSignal()


class GOAL(QtGui.QMainWindow):

    def __init__(self):
        super(GOAL, self).__init__()

        self.initGUI()

    def initGUI(self):

        self.c = Communicate()
        self.c.closeApp.connect(self.close)

        self.setGeometry(300, 300, 290, 150)
        self.setWindowTitle('MOUSE EVENT-SIGNAL')
        self.show()


    def mousePressEvent(self, event):

        self.c.closeApp.emit()


def main():

    app = QtGui.QApplication(sys.argv)
    ex = GOAL()
    sys.exit(app.exec_())


if __name__ == '__main__':
    main()
Output

This window will pop out when you run the program. And, it will close down, when you generate an event from mouse click.
Summary
Thus, finally so far we have understood the concept and theories of event handling. This will help us for sure in understanding and implementing this mechanism in further practices. In the upcoming articles, we will study and practice few more event handing examples and various events under consideration. Just go through the code and understand it better. This is quite simple; some user defined functions, some PyQt classes and objects, and OOPs concept. This is all you need to consider while going through the code. Still, if you face any kind of trouble, always feel free to ask in the comment section. See you there in the next article. HAPPY LEARNING!
Advertisement
Advertisement