Home »
CSS
overflow Property in CSS
CSS | overflow Property: Here, we are going to learn about the overflow Property with syntax and examples in CSS.
Submitted by Anjali Singh, on November 21, 2019
CSS | overflow Property
The overflow property in CSS is used to specify what happens when CSS content overflows the element box.
Syntax:
    Element {
        overflow: overflow value;
    }
Below are some values for overflow property,
- overflow:wrap
- overflow:scroll
- overflow-x and overflow-y
- overflow:visible
- overflow:hidden
- overflow:auto
Let's know about them now.
1) overflow:wrap
overflow-wrap tells a browser that it can break a line of text inside a targeted element onto multiple lines in an otherwise unbreakable place.
This property is specified as a single keyword chosen from the list of values below,
- normal: Lets a word overflow if it is longer than the line.
- break-word: It splits a word into multiple lines, if necessary.
- inherit: Inherits the parent element's value for this property.
Example:
<!DOCTYPE html>
<html>

<head>
    <style>
        .element1 {
            background: red;
            width: 50%;
            height: 100px;
            overflow-wrap: normal;
        }
    </style>
</head>

<body>
    <div class="element1">
	This site is built to provide help to students, professionals and job seekers.
	We are trying to make each tutorial simple to learn and understand.
	This site is not built for business purposes, but it is built for spreading education
	about programming languages and to help learners who are determinant to learn new technologies.
    </div>
</body>

</html>
Output

In the above example, a normal overflow property in applied that lets the word overflow.
2) overflow: scroll
This property is used to scroll the available content with scrolling to view overflowing content.
Most desktop browsers will display both horizontal and vertical scrollbars, whether or not any content is clipped. This can avoid problems with scrollbars appearing and disappearing in a dynamic environment.
Example:
<!DOCTYPE html>
<html>

<head>
    <style>
        .element1 {
            background: yellow;
            width: 50%;
            height: 100px;
            border: 2px solid blue;
            overflow: scroll;
        }
    </style>
</head>

<body>
    <div class="element1">
	This site is built to provide help to students, professionals and job seekers.
	We are trying to make each tutorial simple to learn and understand.
	This site is not built for business purposes, but it is built for spreading education
	about programming languages and to help learners who are determinant to learn new technologies.
    </div>
</body>

</html>
Output

In the above example, the overflow scroll property is applied to the element that allows it to be scrollable if the content doesn't fit.
3) overflow-x and overflow-y
These two properties work similarly as the overflow property and accept the same values. The overflow-x parameter works only on X or left-to-right axis. The overflow-y works on Y or top-to-bottom axis.
Example:
<!DOCTYPE html>
<html>

<head>
    <style>
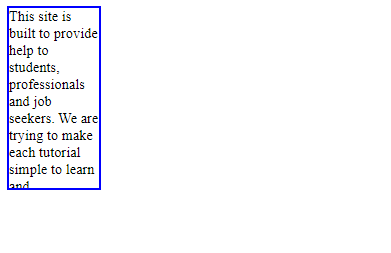
        .element1 {
            width: 100px;
            height: 200px;
            border: 2px solid blue;
            overflow-x: hidden;
            overflow-y: hidden;
        }
    </style>
</head>

<body>
    <div class="element1">
	This site is built to provide help to students, professionals and job seekers.
	We are trying to make each tutorial simple to learn and understand.
	This site is not built for business purposes, but it is built for spreading education
	about programming languages and to help learners who are determinant to learn new technologies.
    </div>
</body>

</html>
Output

In the above example, overflow-x and overflow-y property is applied to hidden so the content in both directions is cut.
4) overflow:visible
This property is used when the content is not clipped and will be rendered outside the content box if it exceeds its container size.
Example:
<!DOCTYPE html>
<html>

<head>
    <style>
        .element1 {
            width: 300px;
            height: 100px;
            border: 2px solid blue;
            overflow: visible;
        }
    </style>
</head>

<body>
    <div class="element1">
	This site is built to provide help to students, professionals and job seekers.
	We are trying to make each tutorial simple to learn and understand.
	This site is not built for business purposes, but it is built for spreading education
	about programming languages and to help learners who are determinant to learn new technologies.
    </div>
</body>

</html>
Output

In the above example, the overflow visible property allows the content more than the size of the element to be visible to us.
5) overflow:hidden
This property is used when the overflow is clipped, and the rest of the content is hidden.
Example:
<!DOCTYPE html>
<html>

<head>
    <style>
        .element1 {
            width: 300px;
            height: 100px;
            border: 2px solid blue;
            overflow: hidden;
        }
    </style>
</head>

<body>
    <div class="element1">
	This site is built to provide help to students, professionals and job seekers.
	We are trying to make each tutorial simple to learn and understand.
	This site is not built for business purposes, but it is built for spreading education
	about programming languages and to help learners who are determinant to learn new technologies.
    </div>
</body>

</html>
Output

In the above example, the overflow hidden property hides the content that is more than the size of the element.
6) overflow:auto
The CSS overflow:auto property is same as the overflow:scroll property but the difference is that auto property adds the scrollbars only when they are necessary.
Example:
<!DOCTYPE html>
<html>

<head>
    <style>
        .element1 {
            width: 300px;
            height: 100px;
            border: 2px solid blue;
            overflow: hidden;
        }
    </style>
</head>

<body>
	<div class="element1">
		This site is built to provide help to students, professionals and job seekers.
		We are trying to make each tutorial simple to learn and understand.
	</div>
	<br/>
	<div class="element1">
		This site is built to provide help to students, professionals and job seekers.
		We are trying to make each tutorial simple to learn and understand.
		This site is built to provide help to students, professionals and job seekers.
		We are trying to make each tutorial simple to learn and understand.
	</div>

</body>

</html>
Output

In the above example, the scrollbars are not added as they are not necessary.
CSS Tutorial & Examples »
Advertisement
Advertisement