Home »
Angular JS
How Angular Application Starts?
The Angular application starts with several key steps that initialize and bootstrap the Angular application. Before learning about how the angular application starts, let's look at how to create an angular application briefly:
Steps to Start Angular Application
Following are the steps to start an Angular's Application:
Step 1: Install CLI
Open the terminal in your IDE's and run the following command to install the CLI first:
ng install @angular/cli -g
Where g refers to installation globally.
Step 2: Create Application
Run the following command to create the first angular application:
ng new myApp
Step 3: Select File
Choose the file with which you want to proceed by using the up and down in your system and press enter:
? Which stylesheet format would you like to use? (Use arrow keys)
❯ CSS
  SCSS   [ https://sass-lang.com/documentation/syntax#scss                ]
  Sass   [ https://sass-lang.com/documentation/syntax#the-indented-syntax ]
  Less   [ http://lesscss.org
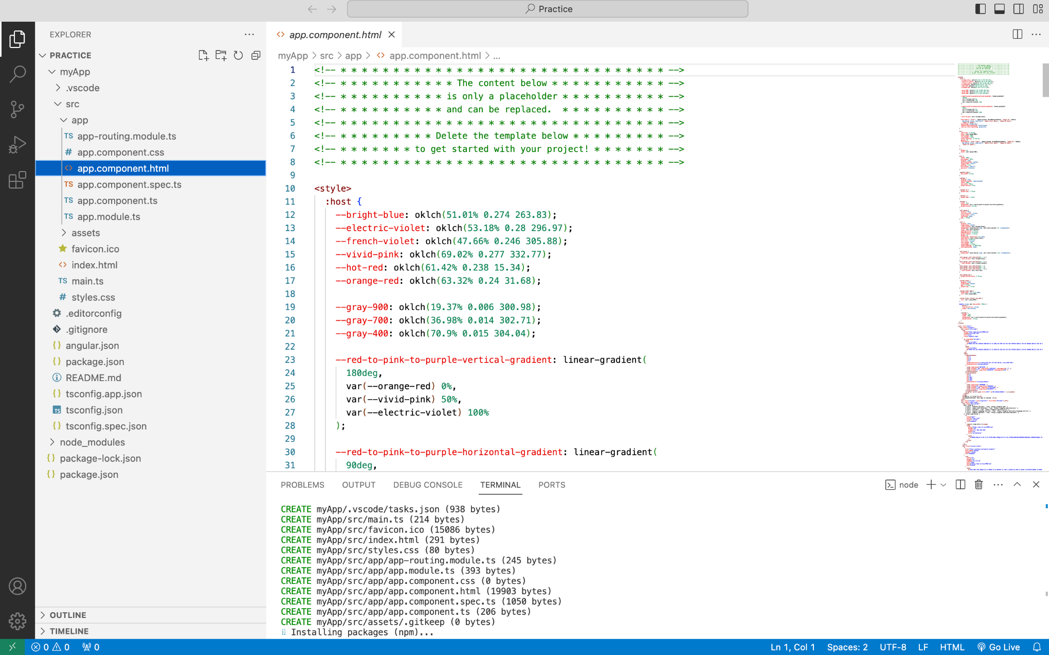
After running the above commands, the first angular application will be created with the name "myApp". To verify it, you can see the following architecture in your current IDE's where you execute these commands.

Step 4: Run Angular Application
Execute the following command to run the Angular application:
npm start
ng serve
Step 5: Open Browser and Load Your Application
Open your friendly browser and hit the following URL:
localhost:4200
4200 is a port number; it may be different for different browsers and systems, but mostly 4200 will be a port number.
Now the time comes to how the Angular application starts: To start the Angular application, we can run the above commands, and the application will be started.
But the important point is what happens at the backend side when we execute the above start commands in our IDE's terminal, so let's understand step by step.
Start Angular Application
The following are several keys that initialize and bootstrap the application:
Bootstrapping Process
Angular applications are bootstrapped using the main.ts file, located in the src folder of the project or application. This file is the entry point for the Angular application.
In main.ts, the Angular platform is bootstrapped. The platform initialization code looks like this:
import { platformBrowserDynamic } from '@angular/platform-browser-dynamic';

import { AppModule } from './app/app.module';


platformBrowserDynamic().bootstrapModule(AppModule)
 .catch(err => console.error(err));
Here, AppModule is the root module of the application (AppModule is generally defined in app.module.ts).
AppModule
The AppModule is an important part of an Angular application. It's decorated with @NgModule and acts as the root module that tells Angular how to create the application.
It imports other modules that contain the components, directives, pipes, and services that the app needs.
Rendering the Application
Once the main.ts file is executed and AppModule is bootstrapped, Angular starts to compile the application and render it in the browser. The root component's template (AppComponent's template) is rendered first.
Excepts these points a main important comes in the role that is also responsible for starting the angular application.
Angular.JSON file
The angular.json file is an important configuration file in Angular projects, primarily used for defining various settings related to building, serving, and configuring your Angular application. Here are the main usages and sections typically found in the angular.json file.
Note
Usually, we used to call this file is a setting file of our Angular application.
Project Configuration
The projects section defines configurations for each project in your Angular workspace. By default, an Angular workspace contains one project ("your-app-name"), but it can include multiple projects, additional applications, or libraries.
Each project has configurations related to build options (architect.build), serve options (architect.serve), test options (architect.test), and more.
Architect Configuration
Under each project (projects.<project-name>.architect), you'll find configurations for different architect commands such as build, serve, test, lint, and e2e. These configurations define how Angular CLI executes these commands and what options are available.
Configuration Options
The configurations section allows you to define different sets of options that can be selected when running various commands (ng build, ng serve, etc.) or with custom scripts.
Angular.json File
Look into the attached codes in the Angular.JSON file to better understand the application setting part:
{
 "$schema": "./node_modules/@angular/cli/lib/config/schema.json",
 "version": 1,
 "newProjectRoot": "projects",
 "projects": {
   "myApp": {
     "projectType": "application",
     "schematics": {
       "@schematics/angular:component": {
         "standalone": false
       },
       "@schematics/angular:directive": {
         "standalone": false
       },
       "@schematics/angular:pipe": {
         "standalone": false
       }
     },
     "root": "",
     "sourceRoot": "src",
     "prefix": "app",
     "architect": {
       "build": {
         "builder": "@angular-devkit/build-angular:application",
         "options": {
           "outputPath": "dist/my-app",
           "index": "src/index.html",
           "browser": "src/main.ts",
           "polyfills": [
             "zone.js"
           ],
           "tsConfig": "tsconfig.app.json",
           "assets": [
             "src/favicon.ico",
             "src/assets"
           ],
           "styles": [
             "src/styles.css"
           ],
           "scripts": []
         },
         "configurations": {
           "production": {
             "budgets": [
               {
                 "type": "initial",
                 "maximumWarning": "500kb",
                 "maximumError": "1mb"
               },
               {
                 "type": "anyComponentStyle",
                 "maximumWarning": "2kb",
                 "maximumError": "4kb"
               }
             ],
             "outputHashing": "all"
           },
           "development": {
             "optimization": false,
             "extractLicenses": false,
             "sourceMap": true
           }
         },
         "defaultConfiguration": "production"
       },
       "serve": {
         "builder": "@angular-devkit/build-angular:dev-server",
         "configurations": {
           "production": {
             "buildTarget": "myApp:build:production"
           },
           "development": {
             "buildTarget": "myApp:build:development"
           }
         },
         "defaultConfiguration": "development"
       },
       "extract-i18n": {
         "builder": "@angular-devkit/build-angular:extract-i18n",
         "options": {
           "buildTarget": "myApp:build"
         }
       },
       "test": {
         "builder": "@angular-devkit/build-angular:karma",
         "options": {
           "polyfills": [
             "zone.js",
             "zone.js/testing"
           ],
           "tsConfig": "tsconfig.spec.json",
           "assets": [
             "src/favicon.ico",
             "src/assets"
           ],
           "styles": [
             "src/styles.css"
           ],
           "scripts": []
         }
       }
     }
   }
 }
}
Summary
In summary, an Angular application starts with the main.ts file, which bootstraps the Angular platform and starts the initialization process by bootstrapping the root module (AppModule). From there, Angular components are initialized, and the application's component tree is rendered in the browser based on the defined module and component configurations.
Advertisement
Advertisement